
Pretext
This guide assumes that you have some experience with Docker and know how to run a SvelteKit project.
Motivation
Building a simple application is easy for most of us. Deploying them on a server is a little more tricky. It’s even more difficult if we want to be able to quickly change whatever we fancy.
A great way to make our lives easier is using Docker for running our applications on different servers. This way we can easily start and stop them, multiply them as much as we need, all with a single command.
Here you will see how you can run a NodeJS application, for example SvelteKit, using Docker.
Setup
At first we of course need an application which we can host. For this we simply initialize a SvelteKit application using:
bash
After you added adapter-node, we’re finished with our SvelteKit application already. Great job!
Now hold in a moment and think about how we want our application to run. We need NodeJS for SvelteKit, we heard somewhere that a load balancer in front might be a good idea, at least for caching if we don’t balance any loads. It’s easier to add now than later. We could use Nginx for this.
We might be handling personal data of our sites visitors or we just care about getting indexed by Google. So HTTPS is important as well. We can create a free certificate using Let’s Encrypt.
So we have 3 different parts of our application we need to care about
- NodeJS
- Nginx
- Let’s Encrypt Since we decided to use Docker and we have multiple services we need to run, we will be going for a Docker Compose setup.
NodeJS
Let’s start with our NodeJS server. At first we create a file called “docker-compose.yml”. This file is the heart of our setup. Nothing runs without it.
version: "3.8"

services:
  nodeserver:
    build:
      context: .
    environment:
      VIRTUAL_HOST: ${VIRTUAL_HOST}
      VIRTUAL_PORT: ${VIRTUAL_PORT}
      LETSENCRYPT_HOST: ${VIRTUAL_HOST}
      LETSENCRYPT_EMAIL: ${LETSENCRYPT_EMAIL}
    restart: unless-stopped
The name of our service will be “nodeserver” and it’s context/files can be found at the same level where our compose file is located. This is the same place we will be adding a file called “Dockerfile” for our NodeJS server.
docker
It has quite a lot inside. So let’s go over it a little bit.
We have a multi stage setup. The first step is to build our application from the files we copy previously, the second step is to take the files we need to run our application and run it, all while discarding the previous files , which we used for building our application.
The reason we go for a multi stage build is so we get rid of some environment variables used in the first step, as well as making our application run on a leaner environment.
If we were to start up our application now, we could reach it at http://localhost:3000.
As you could see we already declared some environment variables ahead of time. We will be explaining them later on.
Nginx
Nginx will be the gate to our application. No user will be able to directly “speak” with our nodeserver. All traffic will go through our nginx-proxy.
  nginx-proxy:
    container_name: nginx-proxy
    build:
      context: ./nginx
    volumes:
      - certs:/etc/nginx/certs:ro
      - /etc/nginx/vhost.d
      - /etc/acme.sh
      - /usr/share/nginx/html
      - /var/run/docker.sock:/tmp/docker.sock:ro
    ports:
      - '80:80'
      - '443:443'
    labels:
      com.github.jrcs.letsencrypt_nginx_proxy_companion.nginx_proxy: ''
    restart: unless-stopped
Because nginx is the door to our application we will be exposing the relevant ports here. These ports have to be opened for the firewall as well, otherwise no traffic will come through.
The build context is not the same as with our nodeserver. Nginx can’t handle JavaScript directly.
We will create a directory called “nginx” in our projects root with 2 files in it. One of those is again a “Dockerfile” and the other will be a configurationfile we call “default.conf”.
For our Nginx Dockerfile it’s straighforward:
docker
We just fixate the Nginx version and copy our previously created config file into our container. Now for the “default.conf”.
Here we have two distinct server blocks. The second block is just for redirecting all incoming traffic to https://myrmod.de. No www and no http is allowed. In the first block we need to set our domain name as server_name. Because we will be using HTTPS with Let’s Encrypt, we add a location block which redirects the .well-known/acme_challenge to a static file.
Within the second location block we simply pass whatever Nginx receives to our nodeserver, we defined in our “docker-compose.yml”.
The text “nodeserver” is exactly what we defined as service name in our compose file. the is whaever we exposed. We did so using the corresponding Dockerfile.
The last thing in this location block are some rules we need for our SSL certificates, that we will be shortly creating using Let’s encrypt.
Let’s Encrypt
For the last of our services we will be using a pre existing docker image. This image, if configured correctly, will automatically create an SSL certificate for us and keep it updated. That’s what I love about Docker, we can be lazy.
  letsencrypt:
    image: jrcs/letsencrypt-nginx-proxy-companion
    environment:
      NGINX_DOCKER_GEN_CONTAINER: nginx-proxy
    volumes:
      - certs:/etc/nginx/certs
      - /var/run/docker.sock:/var/run/docker.sock:ro
    volumes_from:
      - nginx-proxy
    restart: unless-stopped
    depends_on:
      - nginx-proxy

volumes:
  certs:
Here we see some special stuff, that we need for let’sencrypt to work.
The environment variable “NGINX_DOCKER_GEN_CONTAINER” has to be set to the name of our Nginx service. The volumes are shared with Nginx as well. This is so Let’s Encrypt can generate files that are reachable by Nginx.
If you remember we had some environment variables in our nodeserver service:
VIRTUAL_HOST: ${VIRTUAL_HOST}
VIRTUAL_PORT: ${VIRTUAL_PORT}
LETSENCRYPT_HOST: ${VIRTUAL_HOST}
LETSENCRYPT_EMAIL: ${LETSENCRYPT_EMAIL}
We’re reading a .env file from our projects root:
Our letsencrypt service can read these variables from the nodeserver service, because they, as well as nginx-proxy share a Docker network. Thid default network is available in every Compose environment by default.
At the end of our docker-compose.yml we declare a shared volume “certs”.
Deploying our application
For deployment there are endless options, one option is to upload your repository yourself, another is to use GitHub Actions for continous deployment.
For GitHub deployments you will need a file to tell GitHub how we want our application to be deployed.
//.github/workflows/main.yml

name: My Deployment

# Controls when the action will run.
on:
  # Triggers the workflow on push or pull request events but only for the master branch
  push:
    branches: [ main ]

jobs:
  build:
    runs-on: self-hosted

    steps:
      - uses: actions/checkout@master
      - name: Create .env
        run: echo 'VIRTUAL_HOST=${{ secrets.VIRTUAL_HOST }}' >> .env && echo 'LETSENCRYPT_EMAIL=${{ secrets.LETSENCRYPT_EMAIL }}' >> .env && echo 'VIRTUAL_PORT=${{ secrets.VIRTUAL_PORT }}' >> .env

      - name: stop running containers
        run: docker-compose down

      - name: Run all containers
        run: docker-compose up --build -d

      - name: cleanup
        run: rm .env
Below “branch” we have our trigger. Here we will trigger a deployment as soon as the main branch gets updated. In our steps we just define what we would do manually. Like creating a “.env” file. This is a great oppotunity to use github secrets. This way we’re save and can easily update them.
Jobs are the things we want to be done. We have one job, which we want to run on a self-hosted server with a thing called “github-runner”.
This runner will wait for changes in the defined branch. So there is luckily not much configuration needed. As soon as your runner is registered, and runs as a service, you’re ready to go.
Just push and it should you should see your deployment running under the actions tab of your repository
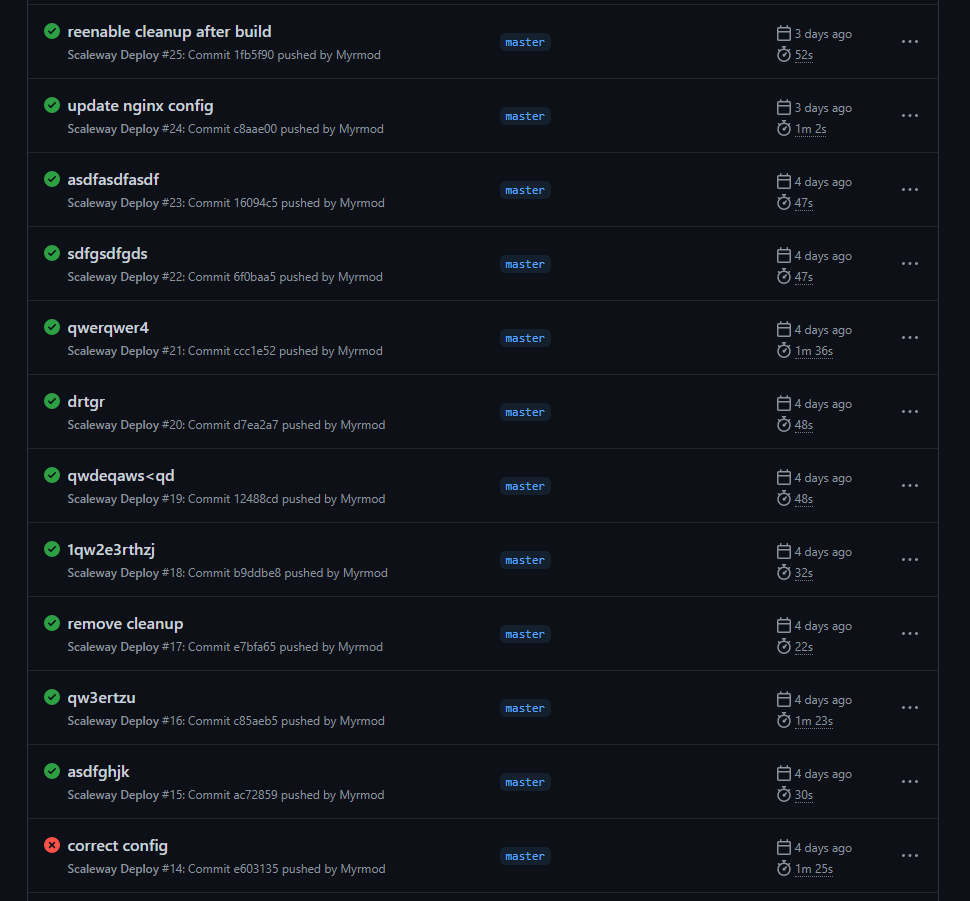
As you can see, don’t be discouraged and relieve your anger by using bad commits, the way I did. You can delete all runs and do a force push so no one will ever know. You can also tell your peers how great you are by adding GitHub Actions successfully on the first try.
Wrapping Up
If you didn’t forgett to open your ports and to point your domain to your server you should be seeing your SvelteKit application running with a fancy HTTPS in front. It’s normal to have difficulties when trying to use technologies you’re not familiar with. I tried to get this process running for 12 hours straight, because I have never done this before. If you have any questions or suggestions feel free to reach out to me at Twitter (@myrmod).